This is part of a comprehensive elementary science curriculum. This one is on materials. I explain why I disagree with most approaches to elementary science here: Stop Questioning Students Before Teaching Them. The approach below uses hands-on lessons that isolate concepts. My approach is explained here: Elementary Science: Healing the Mind-Body Dichotomy.
I have a preschool curriculum on the properties of material. In that one, I cover properties including
- Hard versus Soft
- Rigid versus Flexible
- Opaque versus Transparent
- Shiny versus Dull
- Magnetic versus Dull
- Waterproof versus Absorbent
- Malleable versus Brittle
- Conducts versus Insulates
- Elastic versus Plastic
These things are all directly observable. This elementary series builds on that. A preschooler can identify if something is shiny or dull, but would not be able to understand that materials are made up of particles. That’s where this picks up. It goes to atoms, because I found my first grader was absolutely fascinated by these little tiny particles–the smallest things in the world!!! This is essentially a very beginner class on Chemistry.
Complete Lessons
1. Melting and Freezing Point of Materials
2. Particles in Solids, Liquids, and Gases
3. Compression of Gas
4. High Pressure Goes to Low Pressure
1. Melting and Freezing Point of Materials
I LOVE this lesson. I love kicking off these lessons on material with a melting point lesson because it gets the child thinking in terms of solids, liquids, and gases again and temperature’s effect on them. Plus, it’s not just a science experiment; it’s a logic experiment.
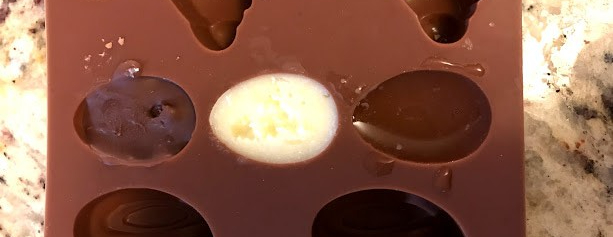
To show that different materials have different melting points, have a competition of sorts between water, chocolate, and butter. Take each, melt them as needed, and put them into candy molds that are identical. If you are doing them all in the same mold, melt the chocolate first because it takes the longest (40 seconds in the microwave). Then the butter (10 seconds tops). Then just put water in one of the candy molds. I do this the night before.An example of a silicone candy mold:
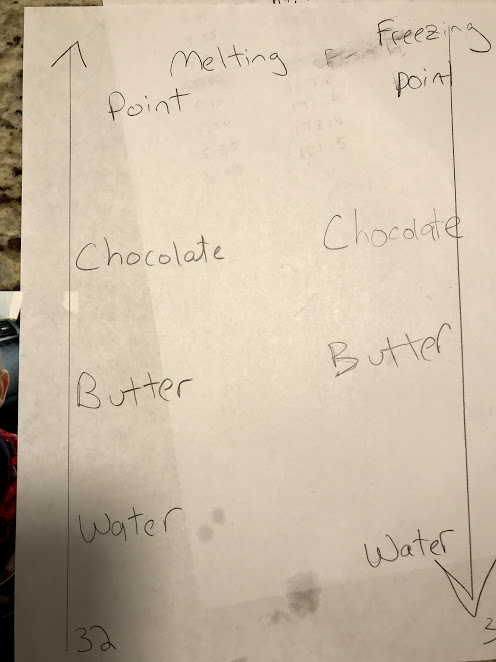
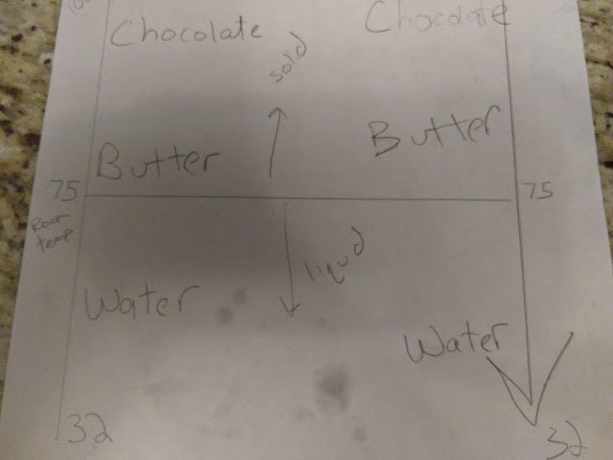
First, make a simple chart to explain how you are going to record the winners. Make a simple line going vertically. At the bottom write 32. That’s the temperature of the solids when they come out of the freezer. Explain there will be a race to see which melts first and you are going to write them from bottom upwards as the temperature increases when you put them on a frying pan.
Then, race! I put them on a frying pan on low heat. Which one is going to win? My kids loved this.
At the risk of giving away the ending, here is what happens after a few minutes:
After I wrote these winners on our scale, I explained to my 6-year-old that if the temperature kept going up, WAY off our scale, eventually the pan would melt too. This fascinated him. Later, look up videos on metal casting to see liquid metal. I then asked him what would happen if the pan was made of chocolate. What would happen if it was made of water? I love these kinds of questions.
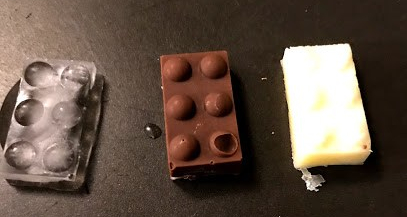
Now do the reverse: see which one freezes first. With my children, I first melted the three substances in the candy molds. My son thought the ice would freeze first–just like the ice melted first.
Within 2 minutes of putting them in the freezer, check. The chocolate will likely be solid (if it was a small amount) and the butter might be not quite frozen yet. Check again in 3 minutes to see the frozen butter. Check again in 20 to see the frozen ice. Plot them again on your chart. Make another scale and this time write them from the top to bottom as you are getting colder. It will line up exactly as the other chart. One shows melting point and the other freezing point.
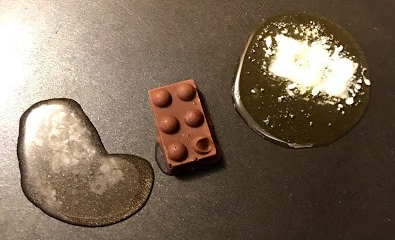
Then we did one more experiment. I let frozen butter, chocolate, and water be at room temperature. The ice will melt right away. My children loved poking this.
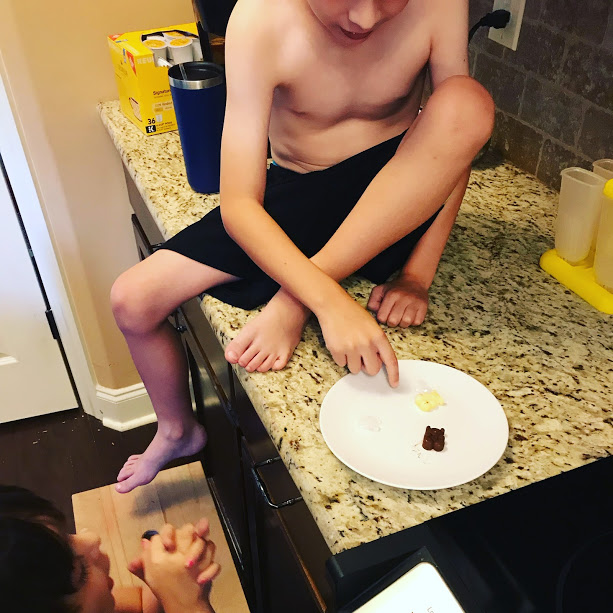
Look at her face!
Then come back to this after about 3 hours. The chocolate will still be a solid and the butter will be just slightly mushy. Now, here is the mind expanding part. Take a note of the temperature of the room, looking at a thermostat if you have one. Compare that to your freezer, which is probably around 32 degrees. Have your child stand in each. Now draw on your scale whatever degree room temperature is (probably 75) right around where butter is on your scale. Draw a horizontal line here. Explain that at room temperature, anything below this line is liquid, such as the water that you have sitting out and are looking at. Anything above the line is a solid. If the line were to move higher because the room got hotter, the butter would be below the line and a liquid, and so on.
This was a great activity. Later I heard my son say, “If metal were left in the sun, it would melt.” Technically wrong though he may be, he was thinking about our lesson. It really expanded his mind as we went through the activities. My 3 year old really enjoyed this too. She told her dad, “First water melts, then butter, then chocolate!”
2. Particles in Solids, Liquids, and Gases
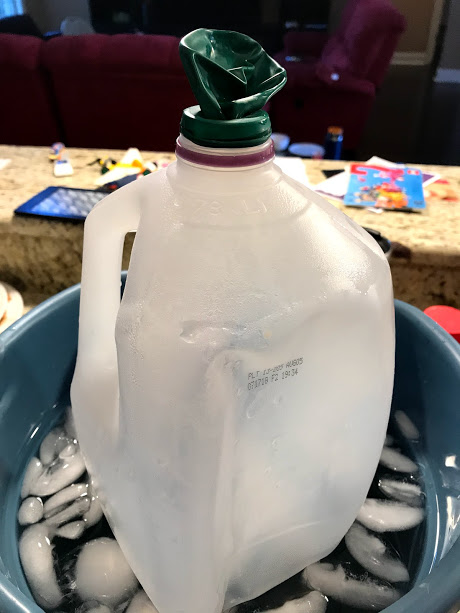
For this, you might start a big pot of water boiling and get a bucket of ice water ready. Don’t fill up the bucket too fill. When you dunk a milk jug in it, it will displace a lot of water.
I start this lesson with this diagram. I’m finding most of my lessons involve both a diagram and a real life lesson. It’s a constant back and forth between ideas and reality and how they relate. I’ll have a document with these pictures that you can print soon.
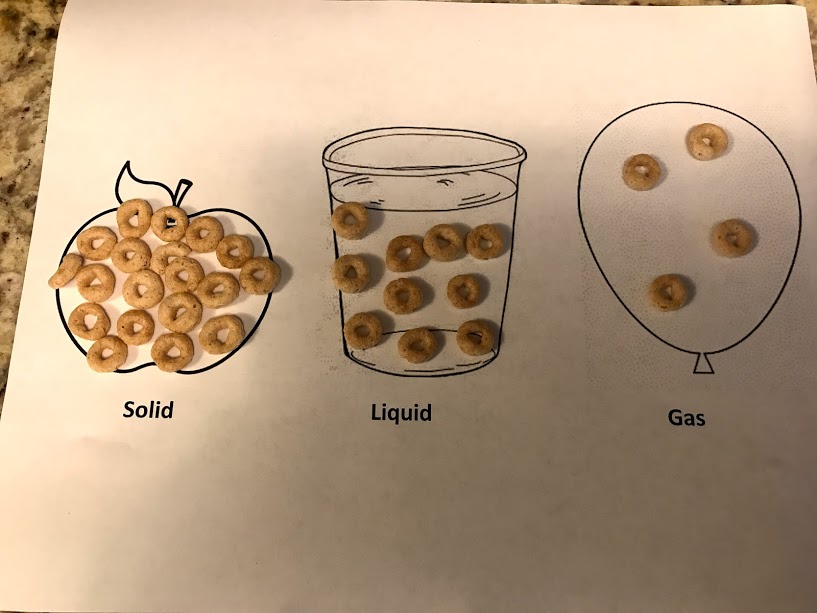
I would have used ice as the solid but water actually expands when frozen, due to the structure of the molecules. Explain this chart and that the Cheerios are particles. Have children try to put their hand through something solid like the counter. Then put their hand through a liquid. Then the air. They can push through liquid and air. That’s because the particles are farther apart.
Then have them do this to demonstrate the idea of particles make up everything. Be together in a group hug. You’re like a solid. Say “it’s getting warmer.” Then “swim” around each other. You’re a liquid. Then say “It’s so hot! It’s so hot!” Then run around like crazy people. You’re a gas.
Here is an experiment that further shows this. First, show a diagram of what is about to happen. I had one more printout of milk jugs, two of them with one that says “Cold” and one that says “Hot.” Put Cheerios on the diagram to show what is happening with the particles. I will also have this available soon.
Then take a milk jug and put a balloon on top. Plunge it into ice cold water. The balloon contracts and becomes flat. This was what it looked like after rubbing ice all over it:
Now pour hot water over it. The balloon will inflate! I have here a colander in a bin to support the jug as you dump hot water on it.

Go back to your diagram and explain that the particles contracted when cold and expand when hot. This has a built-in test to it in that you can ask the child to place the particles on the diagram to show what is going on.
Project idea: ask them to explain all of this to a relative!
Evaporation and Condensation
Put water in two bins. Put a lid on one and not the other. The one without the lid will evaporate over several days. The one with the lid will likely have condensation after the experiment is done.
I especially like putting a plate of water outside on a sunny day and let it evaporate. Explain that it will eventually come back to the earth as rain. It leaves an impression to think that the water they put out will come back.
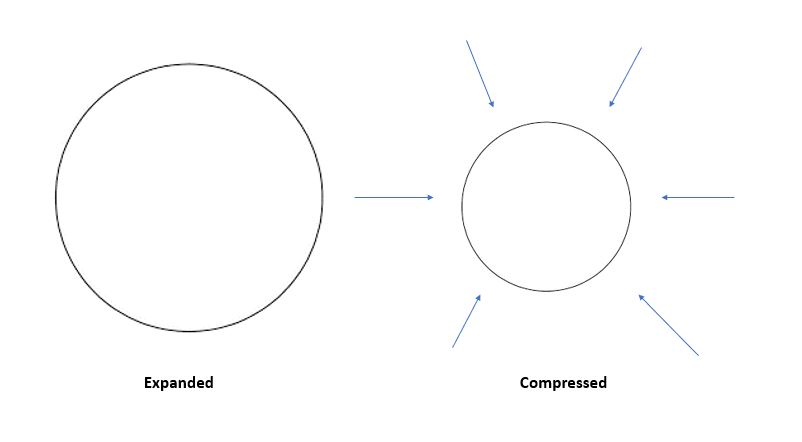
Teachers with many students, you are in the perfect position for this lesson. Have children pretend to be a gas and run around in a sectioned off area in the classroom. You could have them continue to get warmer and warmer such that they go faster and faster. It will be hard not to bump into each other! For an added challenge, build something that is easily knocked over at the edges of the perimeter. The challenge to not knock it over will cause the children to bump into each other.
Now reduce the area that they have to run around. Again have them go slow then faster and faster. They are now “compressed” and they are in an area of high pressure.
Again have an equal number of Cheerios on this diagram to show this:
4. High Pressure goes to Low Pressure
To explain that high pressure goes to low pressure, I put together this inflated balloon with a straw inside and an uninflated balloon on the other side. Truth be told, it didn’t do what I wanted it to do. It would be nice to watch the air in the inflated balloon move over partially to the uninflated balloon. It did do that partially but it’s hard to fill up a balloon without blowing hard. However, this is a great thought experiment. It’s clear that the inflated balloon is high pressure and the uninflated balloon is low pressure. When you stop pinching the center, the high pressure goes to the low pressure. In doing so, it creates wind. Explain this in a straight forward way.

Another way to “feel” this is to blow up your cheeks with air. That’s high pressure. Now let it out. It goes out to the low pressure.
Yet another way is to take a simple balloon and blow it up. That’s high pressure. Now let it out and feel the “wind.” It may be a bit gross, but it’s in the name of science.
As with near every experiment, I have a diagram to explain it. I will have a printout for this shortly. I have a rectangle named “High Pressure” and one named “Low Pressure.” Many Cheerios are in the high pressure side and not as many are on the low pressure side. We pretend they are moving around. I put a straw in the middle then remove the straw. High pressure goes to low pressure.

Project: Have them explain this to a relative
From this point forward everything is a work in progress. Bookmark this can come back for me. Follow me on The Observant Mom for more.
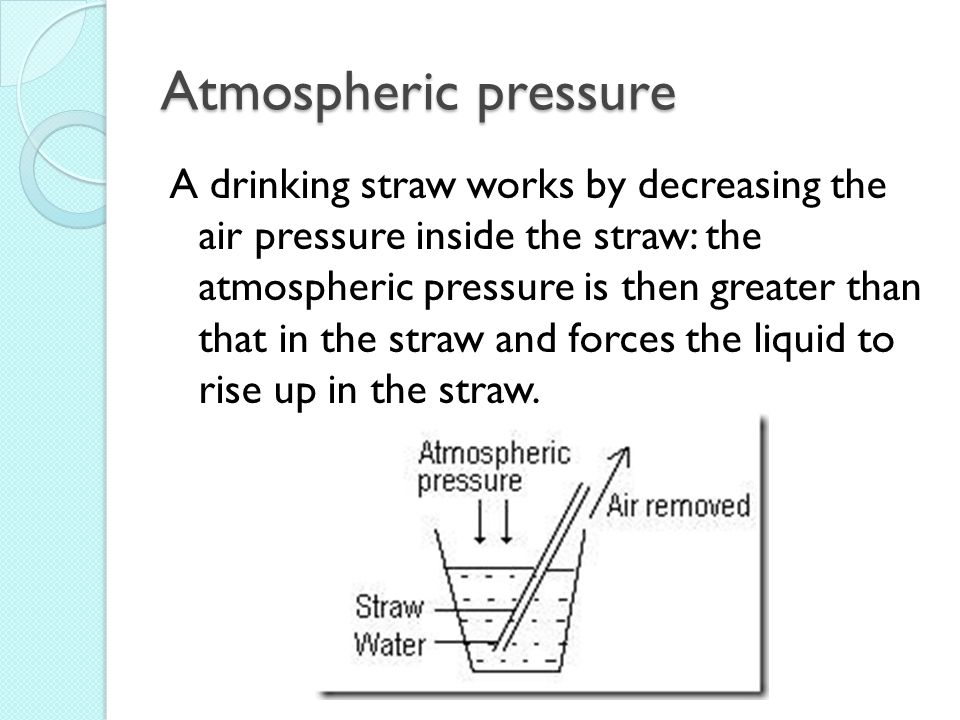
6. How a Straw Works (to show effects of air pressure)
To show how air particles affect pressure and how objects work, showing a straw works helps. Air particles are removed from the straw. Pressure from air rests on the liquid. Show children a diagram of this.
Explain Wind
With the lesson that more air particles create higher pressure on their mind, explain wind. Warm air rises as the particles separate and therefore create less pressure. A cool area condenses and falls. The air particles gush from cold ares to warm areas, creating wind.
Balloon Rockets
I want experiments that use air to move things. The previous straw one did just that. This one fills up a balloon with a straw inserted. You can’t see the air but it powers the balloon when you release it.
How does wind work? Use a weather map.
Soda bottle thing
Book: Experiments with air
Fill up a bottle 100%. Put a small scrap of paper on top then flip it over. Remove your finger. The liquid should stay in. It has to do with pressure.
Atoms and Elements
Read Science History
My son at 6 became extremely interested in atoms after we read about Thales, who thought up the idea of atoms. We read Story of Science by Joy Hakim, which we read after we read Story of the World by Susan Wise Bauer. (I think to appreciate science, a solid understanding of history probably needs to come first.) I would recommend this to see if the same spark is there.
Atoms
Explain that atoms are the smallest thing that make up everything in the whole world. You are likely to get questions about every single thing. Do atoms make up ceiling fans? yes. Beds? Yes. Us? Yes.
You might get a LED microscope and explain that even that microscope still can’t see the atoms.
Tell them how many atoms are in their body: 70 with 27 zeroes after it.
A “Living” Periodic Table
Explain there are different types of atoms, but not terribly many, and they makeup everything. A periodic table that shows the elements and where they are found or what they are used for is sure to impress a child.
Structure of Atoms
I wouldn’t have gone THIS far in the elementary years except my son kept begging for it.
5. Material Types
Guess the material blindfolded. Play the “Guess the Material I am Holding” game. Guess the material with magnets, ice cubes.
Changing materials
Mixture versus a reaction. A mixture is blue balls and red balls together. How can I show two things combining and changing? Isn’t is mind blowing that this happens?
Creating carbon
The carbon snake thing. Then show how black can be created from candles. It’s carbon. Not sure if this should be in “Materials” or not.
Examining Materials
Look at salt versus sugar under a magnifying glass. Look at dirt under a magnifying glass and from different areas. Or do it with the sediment jar.
Magneticism
Hang a bar magnet. Compare it to a compass. Magnetic Levitation. Iron feelings. See how many paper clips it can hold. How far away can it attract a paper clip? Do magnets work under water? maglev trains. Open end activity: find a needle among hay.